I recently purchased a used Lenovo X270 with the FHD (1920×1080) panel and intel i915 graphics. I noticed in both Windows 10 and linux that the display was flickering slightly when I moved the mouse or typed on the keyboard. Even a progress dialog box caused a slight flicker with every update. The flickering was so slight that at first I thought it was my eyes playing tricks on me but after a while it really started to annoy me.
I checked for a loose cable issue or a hardware problem with the panel and found nothing obvious. I started to think I was going to have to return the system for a refund. While copying a file I noticed that the flickering appeared to be related to screen drawing or cpu events. Even moving the bluetooth mouse would cause a slight flickering.
After some searching I discovered that the integrated i915 graphics have a feature called Panel Self Refresh or PSR. It’s
The fix was as simple as adding a kernel argument to the i915 module to disable PSR at boot time. On my Fedora 35 install this was fairly trivial using grubby:
sudo grubby –args=”i915.enable_psr=0″ –update-kernel=ALL
After a reboot the flickering problem was gone.
Photography YouTube channels
I was recently sharing a list of photography related YouTube channels with a friend and wanted to list them here for reference.
Film Photography
- Analog Insights
- Analog Resurgence
- Azriel Knight
- Brae Hunziker
- Bryan Birks
- Dachene
- Darryl Carey
- Daves Film Lab
- EduardoPavezGoye
- Grain
- Grainydays
- Herbie Pabst
- Ribsy
- Island X Film
- Jamie Maldonado
- Jess Hobbs
- Jesse Joseph
- Jonathan Notley
- Karin Majoka
- Kyle McDougall
- Lina Bessonova
- Mac Shoots Film
- Madison Beach
- Matt Day
- Negative Feedback
- Nick Carver
- Pushing Film
- Radical Eye Magazine
- Shoot Film Like a Boss
- Shootswithcoops
- Stephen Milner
- Ted Vieira
- Tim Heubeck
- Todd Korol
- Willem Verbeeck
Alternative Process Photography
Photographic Theory and Artistic Process
G.A.S. (Primarily gear reviews)
HP DL360P Gen8 Smart Array P420 cache disabled replace supercap
I have a few HPE DL360P Gen8 servers in my home lab for testing and learning purposes. They’re older and out of support but they work just fine for my lab testing. Recently one of them had an amber indicator light illuminated. I checked the ILO management interface and noticed that the Smart Array controller was reporting the following error in the IML log:POST Error: 1705-Slot X Drive Array - Please replace Cache Module Super-Cap. Caching will be enabled once Super-Cap has been replaced and charged.
When I logged into the host and ran the ssacli utility I got some more detail on the problem.# ssacli "ctrl slot=0 show" |grep Cache
Cache Board Present: True
Cache Status: Permanently Disabled
Cache Status Details: Cache disabled; backup power source failed to charge to an acceptable level
Cache Disable Reason: Permanent disable condition. The posted write cache has been disabled because the backup power source attached to the flash-backed write cache module has failed to charge.
Drive Write Cache: Disabled
Total Cache Size: 1.0
Total Cache Memory Available: 0.8
No-Battery Write Cache: Disabled
Cache Backup Power Source: Capacitors
Cache Module Temperature (C): 35
I can imagine a scenario where a supercap has failed, I recently had to replace a pair of them on my Liftmaster garage door opener. However I thought I would try some troubleshooting before ordering replacements online. When I looked at the firmware I noticed was version 8.00. A quick search online revlealed a much newer firmware was available for the controller on the hpe website.
After downloading and extracting the latest firmware ( 8.32 as of this writing) I flashed it to the controller following the instructions provided by HPE with the firmware.
hp-firmware-smartarray-46a4d957a7-8.32-1.1]# ./hpsetup
Supplemental Update / Online ROM Flash Component for Linux (x64) - Smart Array P220i, P222, P420i, P420, P421, P721m, and P822 (8.32), searching...
1) Smart Array P420i Smart Array P420i in Slot 0 (8.00)
Select which devices to flash [#,#-#,(A)ll,(N)one]> 1
Flashing Smart Array P420i in Slot 0 [ 8.00 -> 8.32 ]
Deferred flashes will be performed on next system reboot
============ Summary ============
Smart Component Finished

Summary Messages
================
Reboot needed to activate 1 new FW image

Exit Status: 1
Deferred flashes will be performed on next system reboot
A reboot is required to complete update.
After a reboot of the lab host the smartarray cache error went away and it appears to have resolved the issue.
# ssacli "ctrl slot=0 show"|grep Cache
   Cache Board Present: True
   Cache Status: OK
   Cache Ratio: 10% Read / 90% Write
   Drive Write Cache: Disabled
   Total Cache Size: 1.0
   Total Cache Memory Available: 0.8
   No-Battery Write Cache: Disabled
   Cache Backup Power Source: Capacitors
   Cache Module Temperature (C): 35
If the issue returns running the new firmware I’ll update this blog post.
Prevent a high Load_Cycle_Count value on RHEL7/CentOS7
I recently bought a cheap 2.5 inch Seagate ST1000LM048 1TB drive for a small Dell Optiplex 990 system I have. I’m using the system as a basic lab shell host and to host a local http mirror for some often-used software from work. The Optiplex is an ultra small form factor system so it only accepts 2.5 inch laptop drives. I was going to put an SSD in it however in this case space > speed and I didn’t want to spend a fortune on this machine as it’s 6 years old.
One thing I noticed with this cheap $60 drive is it seems to have fairly aggressive APM features. In 12 hours of on-time it incremented the Load_Cycle_Count over 300.
[root@shell ~]# smartctl -a /dev/sda |grep Load_Cycle_Count
193 Load_Cycle_Count 0x0032 100 100 000 Old_age Always – 315
I did some research online and it seems to be a fairly common issue. I remember having this issue with some WD Green drives 5 or 6 years ago. I hear if you contact Seagate support they have a tool called SeaChestUtilities that can permanently disable some drive power features however the easier route for me is to use the linux hdparm tool.
The solution then was to use hdparm to adjust the APM timer for the drive. After a quick yum search I located hdparm and installed it. Running hdparm -B /dev/sda will tell you the current value from 1-255, with 1 being the most aggressive power saving and 255 being disabled.
Since this system will be online 24×7 I chose to disable mine with hdparm -B 255 /dev/sda although I also see people suggesting a value of 254. You may want to play with the value to find the best results for you, especially if you’re using a battery powered device.
The only issue with this approach is the fix is only temporary and is lost on the next reboot. I looked at the hdparm man-page and it suggests using /etc/hdparm.conf for permanent changes however on RHEL7/CentOS7 there isn’t a systemd unit file for hdparm so it’s not entirely clear if the file will be read on boot. I opted to go the the easiest way and add my hdparm string to /etc/rc.d/rc.local:
[root@shell ~]# grep hdparm /etc/rc.d/rc.local
/usr/sbin/hdparm -B 255 /dev/sda
[root@shell ~]# chmod u+x /etc/rc.d/rc.local
[root@shell ~]# systemctl enable rc-local
[root@shell ~]# systemctl status rc-local
â— rc-local.service – /etc/rc.d/rc.local Compatibility
Loaded: loaded (/usr/lib/systemd/system/rc-local.service; static; vendor preset: disabled)
Active: active (exited) since Tue 2018-03-27 16:36:17 MDT; 26min ago
Mar 27 16:36:17 shell.sysop.ca systemd[1]: Starting /etc/rc.d/rc.local Compatibility…
Mar 27 16:36:17 shell.sysop.ca rc.local[15796]: /dev/sda:
Mar 27 16:36:17 shell.sysop.ca rc.local[15796]: setting Advanced Power Management level to disabled
Mar 27 16:36:17 shell.sysop.ca rc.local[15796]: APM_level = off
Mar 27 16:36:17 shell.sysop.ca systemd[1]: Started /etc/rc.d/rc.local Compatibility.
Now every time on boot it will adjust the drive’s APM settings. In the last 8 hours the Load_Cycle_Count has not increased.
Multiple monitor position in linux
I have been using Cinnamon for my window manager on my linux desktop. I’m using a Thinkpad T460p with the dock and a pair of U2311H monitors rotated to the left side by side. This config is fairly easy to setup in Windows and OSX and works on linux but can require a little more fiddling.
The default cinnamon display settings dialog did not allow me to position the monitors relative to each other. Instead if I tried to drag a monitor closer or change it’s position the displays would flip around to be on top or on the bottom. There was no small adjustments, just wild snapping around.
So dragging an application window or even moving the mouse from my two monitors to the laptop meant that if I exited the dell monitor high up on the panel the mouse would appear low on my laptop’s display. Additionally the panels appeared to have a large buffer space between them so that when dragging a window across displays it disappears into the upside-down (You should really watch Stranger Things on Netflix) for a bit before reappearing on the next monitor. This incongruity bothers me to no end.
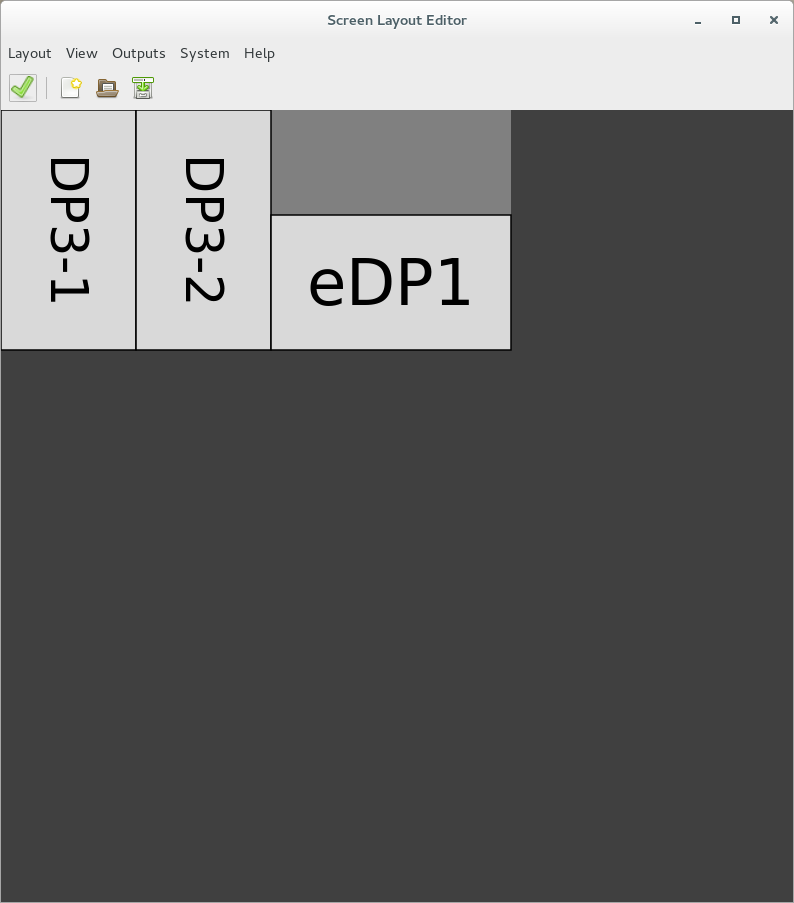
Then a stumbled upon ARandR, a fantastic little tool for adjusting your monitor’s position and resolution. It’s in the It’s a gui front end for xrandr and it works perfectly! No manually counting pixels to adjust your monitor’s relative position.
The best part is, now that I fixed the position in ARandR the cinnamon display settings dialog seems to work as expected? I’m sure it’s a bug but I don’t have time to track it down.
If you find yourself about to pull your hair out with multi-monitor position and orientation in linux try ARandR!